"It's the little things in life which make it magical..."

Monday 19 December 2011

Raspberry Cheesecake Brownies


Lovingly adapted from Taste.com


For a while now I’ve been on an indoor pilgrimage to find the perfect cheesecake brownie. One where the textures compliment each other, with a lovely and smooth cheesecake, and an extra-fudgy brownie.

Some were disappointing, where the brownie was not brownie but more akin to a chocolate sponge cake. But this recipe delivers. Whilst there is no crisp brownie edge, there are no dried out bits, and the raspberries add that little something extra. One piece is not enough, which depending on the way you look at it could be a good or a bad thing….

Ingredients

Brownie:

200g 70% Cocoa Chocolate
200g Butter
250g Caster Sugar
3 Eggs
110g Plain Flour

Cheesecake:

400g Cream Cheese
150g Caster Sugar
2 Eggs
2 tsp Vanilla Extract
Frozen Raspberries

Method

Preheat oven to 160°C (fan forced). Grease and Line a 20cm x 20cm baking tin.

Brownie:
Melt chocolate in a heat safe jug and set aside to cool.
Cream butter and sugar until pale, then beat in the eggs one at a time.
Stir in the melted chocolate, then fold in the sifted flour.
Spread mixture into the pan.

Cheesecake:
Beat the cream cheese, sugar, eggs and vanilla until smooth.
Spread mixture over the brownie layer.
Push desired number of raspberries into the surface (next time I would squish in a few more than shown).


Bake for 45 minutes (centre will still be quite wobbly). Leave to cool, then refrigerate overnight. Do not be tempted to eat before, as these are so much better once they are set and cold, trust me! When ready for a brownie-feast the next day, cut into 16 and enjoy!


Notes

The beaten brownie batter was rather pale, which at first caused me concern due to my love of ultra-chocolate-ness. Upon serving the next day however, the revealed brownie layer was a deep chocolate colour and decadent in its flavour, phew!

You could even place raspberries between the brownie and cheesecake layers as well as on the top, for an extra raspberry hit.

The images show a ¼ of the brownie mixture reserved and swirled into the cheesecake, I would skip this as it is a mere visual which is a bit messy. By doing two distinct layers, the lovely red raspberries are more visible on the surface. 

Sunday 11 December 2011

Wholemeal Berry Ricotta Scones


Lovingly adapted from 'Whole wheat raspberry ricotta scones' by Smitten Kitchen.


These scones take the old lady out of scones. They are a little bit grownup (by using ricotta, berries and wholemeal), moist in texture (unlike many unfortunate scones), and extremely scrumptious, whilst still being simple to make. These are great as a refreshing take on one’s Sunday breakfast treat (as I know that we all rarely deviate from our beloved pancakes)...
Ingredients

2 cups Plain Wholemeal Flour
1 tbs Baking Powder
1/4 cup Sugar
80g Butter
250g Frozen Mixed Berries
1/3 cup Evaporated Milk
250g Light Ricotta

Method

Preheat oven to 220°C (fan forced), line two baking trays with baking paper.

Place flour, baking powder and sugar in a large bowl and mix.

Cube the butter, add to the flour mixture and rub in using fingertips until the flour is like breadcrumbs in consistency.

Using a spatula, mix in the berries. Then add the milk and ricotta and mix until the flour is just combined into a dough.


Place dough onto a floured surface, and sprinkle it with flour. Using hands, mould the dough into a rectangular shape, of about 1inch in thickness.


Cut into 12 segments, and bake for approximately 15 minutes. Eat instantly : )

Notes

The scones may be ever so slightly underdone after this amount of cooking time, but the residual heat present after they are removed from the oven, and before they are served is enough to make the scones non-doughy, but not too much cooking so as to have dried out scones (which is not so nice either).

These have such yummy ingredients in them that there is no need for any condiments, just eat them straight!

Happy baking.

Thursday 8 December 2011

Cookie Dough and Marshmallow Cupcakes


So these are pretty awesome…the idea is inspired by a similar recipe by joy the bakerI decided to change it up a bit though…


Because it is rather indulgent, I decided to go with a classic cupcake, as opposed to a chocolate one and then use a rich double choc cookie dough instead of peanut butter. Every time I see the method description "...just beat in a bowl over a pot of simmering water…” I head for the hills, thus, in my ability to avoid such a task I have used a cheat’s marshmallow frosting, no simmering water or cream of tartar required!

Cupcakes

Ingredients

2 Eggs
4oz Butter
6oz Sugar
8oz Self-raising Flour
2/3 cup Milk
2 tsp Vanilla Extract

Method

Preheat oven to 180°C (fan-forced). Line a 12 hole cupcake tin with cupcake papers.

With electric beaters, beat eggs, butter and sugar until well creamed.

Add the vanilla, then approximately 1/3 the milk and 1/3 of the flour, and beat in well. Repeat until all the milk and flour is added.

Divide batter evenly between the 12 cupcake wells, and bake for approximately 15-20 minutes, until a skewer comes out clean.


Cookie Dough

Lovingly adapted from the ‘double chocolate cookies’ recipe in Simple Essentials: Chocolate by Donna Hay.

Ingredients

100g good-quality Dark Chocolate (>50% cocoa content)
50g butter
¾ cup Brown Sugar
¼ cup Cocoa Powder
1 cup Plain Flour
1 tsp Vanilla Extract
1 Egg

Method

Sift flour and cocoa into a small bowl and set aside.

Place chocolate, butter and sugar in a microwave-safe jug. On medium-low power, microwave in 1-minute increments, stirring each time, until completely melted and combined. Do not over-heat otherwise the chocolate may burn.


Once chocolate mixture has cooled slightly, add the vanilla and egg, and mix-in thoroughly.

Then, add in a little of the flour mixture to the chocolate mixture and completely combine before adding more flour. Repeat this until all the flour is added and combined.

Roll the dough into balls of your desired size (mine were about 3cm in diameter).  You will only need 12, so any leftovers can be eaten (recommended) or stored in a container in the fridge for use as cookie-dough pops (equally recommended).

Marshmallow

Lovingly adapted from the ‘home-made marshmallow crème’ recipe in Whoopie Cakes by Susanna Tee.

Ingredients

80g Icing Sugar
3 Egg Whites
250g (approximately) Glucose Syrup
Pinch of Salt
3 tsp Vanilla Extract/Vanilla Bean Paste

Method

Using an electric mixer, beat egg whites, syrup and salt on high speed until thick and doubled in volume. Add the vanilla, and beat in well.

Slowly add the sifted sugar whilst the mixer is on a low speed, until well combined.


Assembly

Place ball of cookie-dough onto the top of each cooled cupcake. Then using a piping bag with a large nozzle hole, pipe marshmallow in a circular motion, stating at the cupcake and working your way up, around the cookie-dough.


Use a blowtorch to toast the marshmallow. Can’t give advice on this aspect as I don’t have one in my possession…we attempted using matches (not recommended), was a rather epic fail. Makes them taste bad, and took about a million of them to achieve a faint brown colour.


Notes

If you don’t want to do all these parts in one day, the cookie-dough balls and cupcakes can be stored in the fridge, and then assembled when you are ready to eat them in the next day or so.

If you are lucky enough to have leftovers, the assembled cupcakes can be stored in the fridge for about 3 days, after that, the marshmallow starts to separate and go a bit gross.

Happy baking.

Saturday 26 November 2011

Jam Doughnut Cupcakes


Lovingly adapted from ‘Jam doughnut cupcakes’ in Cupcakes by Murdoch Books.


What’s better than a doughnut? A doughnut-cupcake of course! ‘Cus you can eat more when their not deep-fried right…?

Whilst these cupcakes aren’t of an authentic I-just-ate-a-doughnut taste, they are a pretty good substitute, without the time-investment which is required when making traditional doughnuts.

Ingredients

1¼ cups Self-raising Flour
½ cup Brown Sugar
½ cup Milk
2 Eggs
1 tsp Vanilla Extract
½ tsp Dried Yeast
Raspberry Jam
20g Butter
1 tbs Sugar mixed with 1 tbs Cinnamon

Method

Preheat oven to 180°C and line 16 standard muffins wells with cupcake papers.

Whisk milk, eggs, vanilla and yeast in a small jug.

Place flour and sugar in a bowl, mix and create a well. Gradually whisk the milk mixture into the well until combined and smooth.


Divide half the mixture evenly between the lined-wells. Then add a teaspoon of jam into each, and then top with the remaining batter.


Bake for approximately 10 minutes. Brush tops with melted butter, and sprinkle with the cinnamon-sugar.


Notes

These would go great with a milkshake to cut through the sweetness of the jam-filled centres...

Happy baking.

Friday 25 November 2011

Jelly Cakes


Lovingly adapted from a Coles brochure.

As you already know, I love all things faerie. Thus, I’m always looking for foods which would be appropriate to serve at a faerie-themed party…and these cute-as-a-button jelly cakes are just that. Delicate, pink and ultra-sweet. Nostalgic of those parties you attended when you were five, but more grown up than bread and butter with sprinkles…


Ingredients

1 Packet Raspberry Jelly Crystals
50g Butter
1 cup Icing Sugar
1 tsp Vanilla Extract
1 Egg
½ cup Milk
3 cups Shredded Coconut

Method

Make jelly, per packet instructions and refrigerate until it is of an egg-white consistency, about 2½ hours.
 
Pre-heat oven at 180°C/160°C fan-forced. Line a 30cmx20cm baking tin with baking paper and cooking-oil spray.

Beat butter, sugar and vanilla with electric beaters, until creamy. Add the egg, then beat until combined.


Add milk, sift in flour and fold in until combined. Spread batter evenly in prepared tin.

Bake for approximately 15 minutes, until a skewer comes out clean. Cool cake completely, then cut into 24 segments.


One at a time, dip a cake into the jelly, covering all surfaces, and allowing excess to drip off. Then coat the cake, by rolling it in a bowl of the coconut. Place cakes on a tray and refrigerate until set, about 2 hours.


Notes

I know that just thinking about these cakes makes you want to throw a faerie party, whilst you may not wish to openly admit it…It’s Christmas soon, and wouldn’t a ‘Sugar-plum faerie’ theme be just the modern twist you were looking for? I know you want to.

If you do, you’ll need some equally grown-up wings, to show that you've graduated from pantyhose stretched over coat-hangers…fancyfairy.com


Happy baking.

Monday 21 November 2011

Mermaid Princess 'Azalea'

Whilst faeries will always have a special place in my heart, I also love mermaids.

There is just something magical about imagining what life is like down in the depths of the vast ocean. Some areas of which, mere humans can only dream of exploring...

When illustrating merfolk, I love giving them gill-like fins in place of ears and adorning them in shells and strands of pearls. This one has a rather simple tail, but if making the tail the focus, you could be as creative as you want with the vein design and the number of fins drawn.


Other ideas for inclusion in merfolk illustrations: Bejewelled crowns, intricate shell hairpieces, fallen human treasures, webbed fingers, blue-green complexion, sea-anenome hair, starfish headpiece, scales extending over the entire body...the creative options are endless!

This is my favourite mermaid illustration by Kei Acedera from Imaginism Studios:


I just love the cute cartoon style, the minimal colour palette and use of under-the-sea features.

Happy drawing.

Trollflings

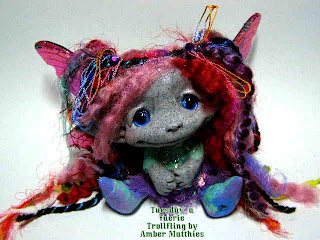
I just love Amber Matthies work. 'Trollflings' are the cutest little creations, and whilst they all possess her signature look, each one is so unique. I admire how she is always using a new material, facial expression, or theme to continue developing and expanding her creations.

This is her latest gem:


Some of my favourites:


To see more of her adorable pieces follow her on facebook, or on her blog.

Now, I have all the inspiration I need to go and draw some faeries! I hope that you have found some inspiration to!

Happy creating.

Friday 18 November 2011

High Fashion Princess Ariel

As soon as I saw the artwork accompanying the Disney Princess designer collection dolls, I fell in love with the 'fashion illustration' style.


Here is my own version of Princess Ariel...


Materials - 300gsm medium tooth A4 water-colour paper, 0.4mm fine-tip black ink pen, Derwent water-colour pencils, no. 4 paintbrush.

Happy drawing.

All-day Breakfast Loaf


Recipe lovingly adapted from ‘make-ahead breakfast loaf’ in Family, Food and Weekend Feasts by Janelle Bloom.


My mum has a strong dislike for all things fruitcake, due to an unfortunate over-fruit-caked childhood…but she loves it when I make all-day breakfast loaf.

It’s entitled ‘All-day’, because I could seriously eat this all day. It’s super scrumptious. Whilst your tastebuds will think this is cake, your waist will not be neglected, as it is with notorious café items, cleverly labelled “bread”, albeit being cake.

There are a lot of ingredients, but once you get everything out and prepared, it is relatively straightforward to create baking magic!


When making this I’m a little more generous with the amount of spice added, for who can resist the fragrant smell of cinnamon and nutmeg? And, perhaps a few extra fig or craisin manage to get themselves into the saucepan also…


Ingredients

200g roughly chopped dried figs
200g roughly chopped dried dates
100g Sultanas
50g Goji berries
50g Craisins (dried cranberries)
1 tsp Bi-carbonate Soda
1 tsp Ground Nutmeg
2 tsp Ground Cinnamon
2 Eggs
¼ cup Olive Oil
2 cups Self-raising Wholemeal Flour
¼ cup Ground Linseeds (flaxseeds)
30g Pepitas (pumpkin seeds) + Extra for top
30g Sunflower seeds + Extra for top

Method

Preheat oven to 180°C/170°C fan-forced.

Place dried fruits and 2 cups water into a saucepan on medium-high heat, and bring to the boil. Boil for approximately 4 minutes, until water is half absorbed, stirring occasionally.

Meanwhile whisk eggs and oil in a small jug and set aside.

Place flour, linseed, pepitas and sunflower seeds in a large heat-safe bowl, mix together, and set aside.

Take fruit off the heat and cool for 5 minutes before adding the sifted soda and mixing well. After bubbling has subsided, mix in the spices. Once cooled for a further 10 minutes or so, thoroughly stir in the egg mixture.

Then, add this mixture to the flour, and mix until just combined. Place mixture into a 20cm x 20cm, lined and spray-oiled loaf pan. Spread evenly and sprinkle with a little (or a lot) of the extra seeds, and lightly press these into the mix using the back of the mixing spoon.

Bake for 45 minutes, or until a skewer comes out clean (unless of course you hit a bit of juicy fig).

Notes

Enjoy for breakfast, morning-tea, lunch, afternoon-tea, dinner, supper, um…pre-breakfast, midnight munchies….?

I like mine with a cup a hot peppermint tea, and for a treat with a drizzle of maple syrup. Also, great to stop you craving chocolate before dinner-time comes around.

Happy baking.

To new beginnings...

I'm so very excited to be commencing this new venture!

This blog is a place for all those little things in life which are the icing on the cake...so if you ever find yourself saying "I'm bored", this is for you!

Because there are so many things which I find joy in, I can't settle with having a single purpose blog! My main posts will include: artworks, party-themes and recipes I make, and those idea-inspiring one's of others which I love!

Enjoy.